How to Reduce HTTP Calls From 15 Lines to 2 Lines Using React SWR
To read more articles like this, visit my blog
If you are a React developer, you must have wished of having a library for managing all the API calls.
I am not talking about fetch or Axios. Rather a library to manage all the loading state, prefetching, caching, pagination, validation, etc.
Well, I have good news for you. Today we will explore a package named SWR. Which recognizes itself as React Hooks for Data Fetching .
Let’s see how what this library can do for us and when we can use it.
STEP 1: Install Dependency
You can install it just by typing
yarn add swr
Step 2: Create a Fetcher function
You can use all kinds of fetcher functions whether it’s REST or GraphQL.
A fetcher function can just be a wrapper around the native fetch function. You can use axios if you want
A typical fetcher function with fetch API for REST endpoints can be
const fetcher = (...args) => fetch(...args).then(res => res.json())
If you want to Axios then it can be
const fetcher = url => axios.get(url).then(res => res.data)
Step 3: Time to use SWR
Let’s use the magical useSWR hook inside our component
import useSWR from 'swr'

function ProductDetails () {
  const { data } = useSWR('/api/product/123', fetcher)

  return <div>hello {data.name}!</div>
}
This useSWR hook takes 2 arguments. One is the key(In our case it’s /api/product/123 ) and the second is a fetcher function.
What this hook does is returns the product details inside the data. But now you are wondering how is it useful because we can do the same thing just by calling axios or fetch directly inside the component.
Well, Let me show you that.
Step 4: How it can reduce code?
In a typical application, we generally do our API call’s like the following. Where we generally care about 3 things. the actual data, loading state, and the error if there is any.
Before
const URL = '----'

function ProuctDetails () {

  const [loading , setLoading] = useState(false)
  const [data , setData] = useState(null)
  const [error , setError] = useState(null)

  useEffect(() => {
    try{
      setLoading(true);  // setting the loading true
      const response = fetch(URL)
      .then(response => response.json())
      .then(data => {
        setData(data)     // setting the data
        setLoading(false) // data fetching is complete
      });
    }catch(e){
      setError(e)         // setting the error
    }
  },[])

  return <div>{`the details is ${data.toString()}`}</div>
}
But with the help of the useSWR hook what we can just do is
After
function ProductDetails () {
  const { data , error } = useSWR('/api/product/123', fetcher)
  const loading = !error && !data

  return <div> {`product details is ${data.toString}`}!</div>
}
So we were able to reduce code by a lot! Which is great!
Step 5: Global Error Handling
Handling API errors in any application can be a painful task if you are not smart. SWR has a pretty nice feature to get you covered and reduce even more hassle!
It exports a context named SWRConfig which can provide some global control over all hooks. In the below example, we have defined a common fetcher function for all hooks and also added the global error handler.
import useSWR, { SWRConfig } from 'swr'

function ProductsComponent () {
  const { data: products } = useSWR('/api/products') // we don't need to pass fetcher here

  //...
}

function App () {
  return (
    <SWRConfig
      value={{
        onError: (error, key) => {
          if (error.status !== 403 && error.status !== 404) {
            // we can show a notification here or log the error
          }
        }
        fetcher: (resource, init) => fetch(resource, init).then(res => res.json()) // common fetcher function
      }}
    >
      <ProductsComponent />
    </SWRConfig>
  )
}
So now you don’t have to handle errors everywhere you are using useSWR . It’s very powerful and handy once you start to use it.
Step 6: Pre-fill Data
If you want to make the page instantly interactive by providing some default data SWR has that option too.
You can provide some pre-existing data (from cache or somewhere else) when the useSWR hook fetches the data in the background and displays that updated data once the data loading is finished.
useSWR('/api/data', fetcher, { fallbackData: prefetchedData })
Here we define the fallbackdata property as pre-filled data. This technique is especially useful when you are using NextJS and generating some data inside the getStaticProps. Everything becomes super fast in this way.
Step 7: Mutation
One limitation of SWR is it doesn’t support mutation directly. However, we can achieve a similar thing by using a handy function named mutate .
What mutation does is gives the ability to call the API manually. For example when you want to submit a form or something.
import useSWR, { useSWRConfig } from 'swr'

function CreateBlogComponent () {
  const { mutate } = useSWRConfig()

  const createNewBlog = () => {
     mutate('/api/blog')
  }

  return (
    <div>
      <button onClick={createNewBlog}>
        Create Blog
      </button>
    </div>
  )
}
This makes every API call very centralized which helps to keep the application clean.
When should you use it?
I have shown the basics of this powerful library. You can go a long way with it. There are more features like caching, mutation, and so on. And it can cover 95% of your use cases pretty well.
However, the main alternative to SWR is the react-query that offers more features than SWR.
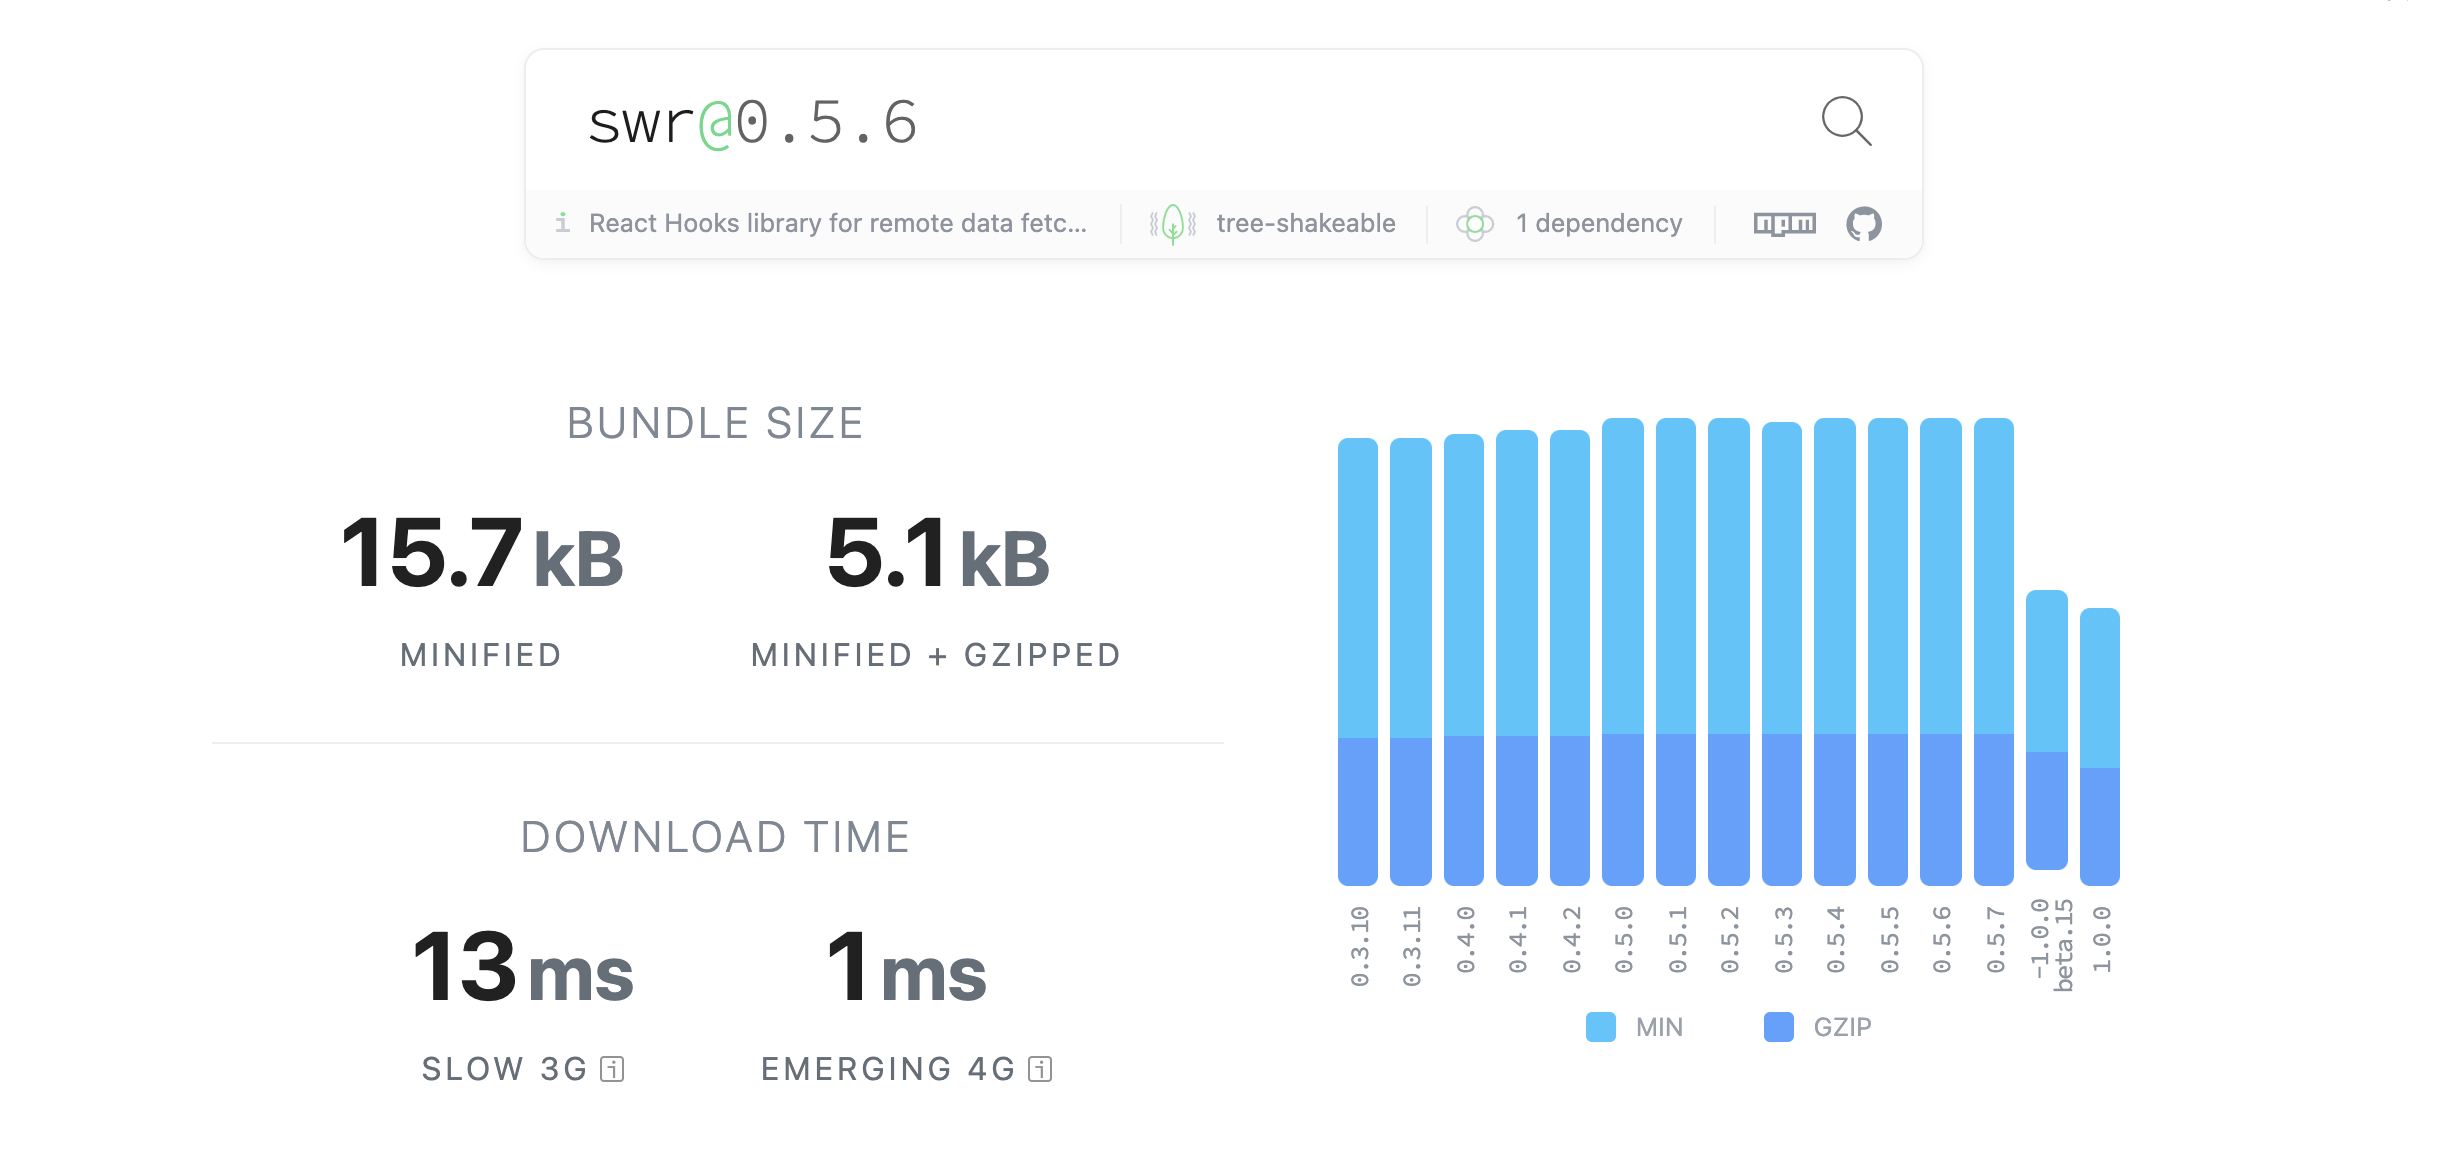
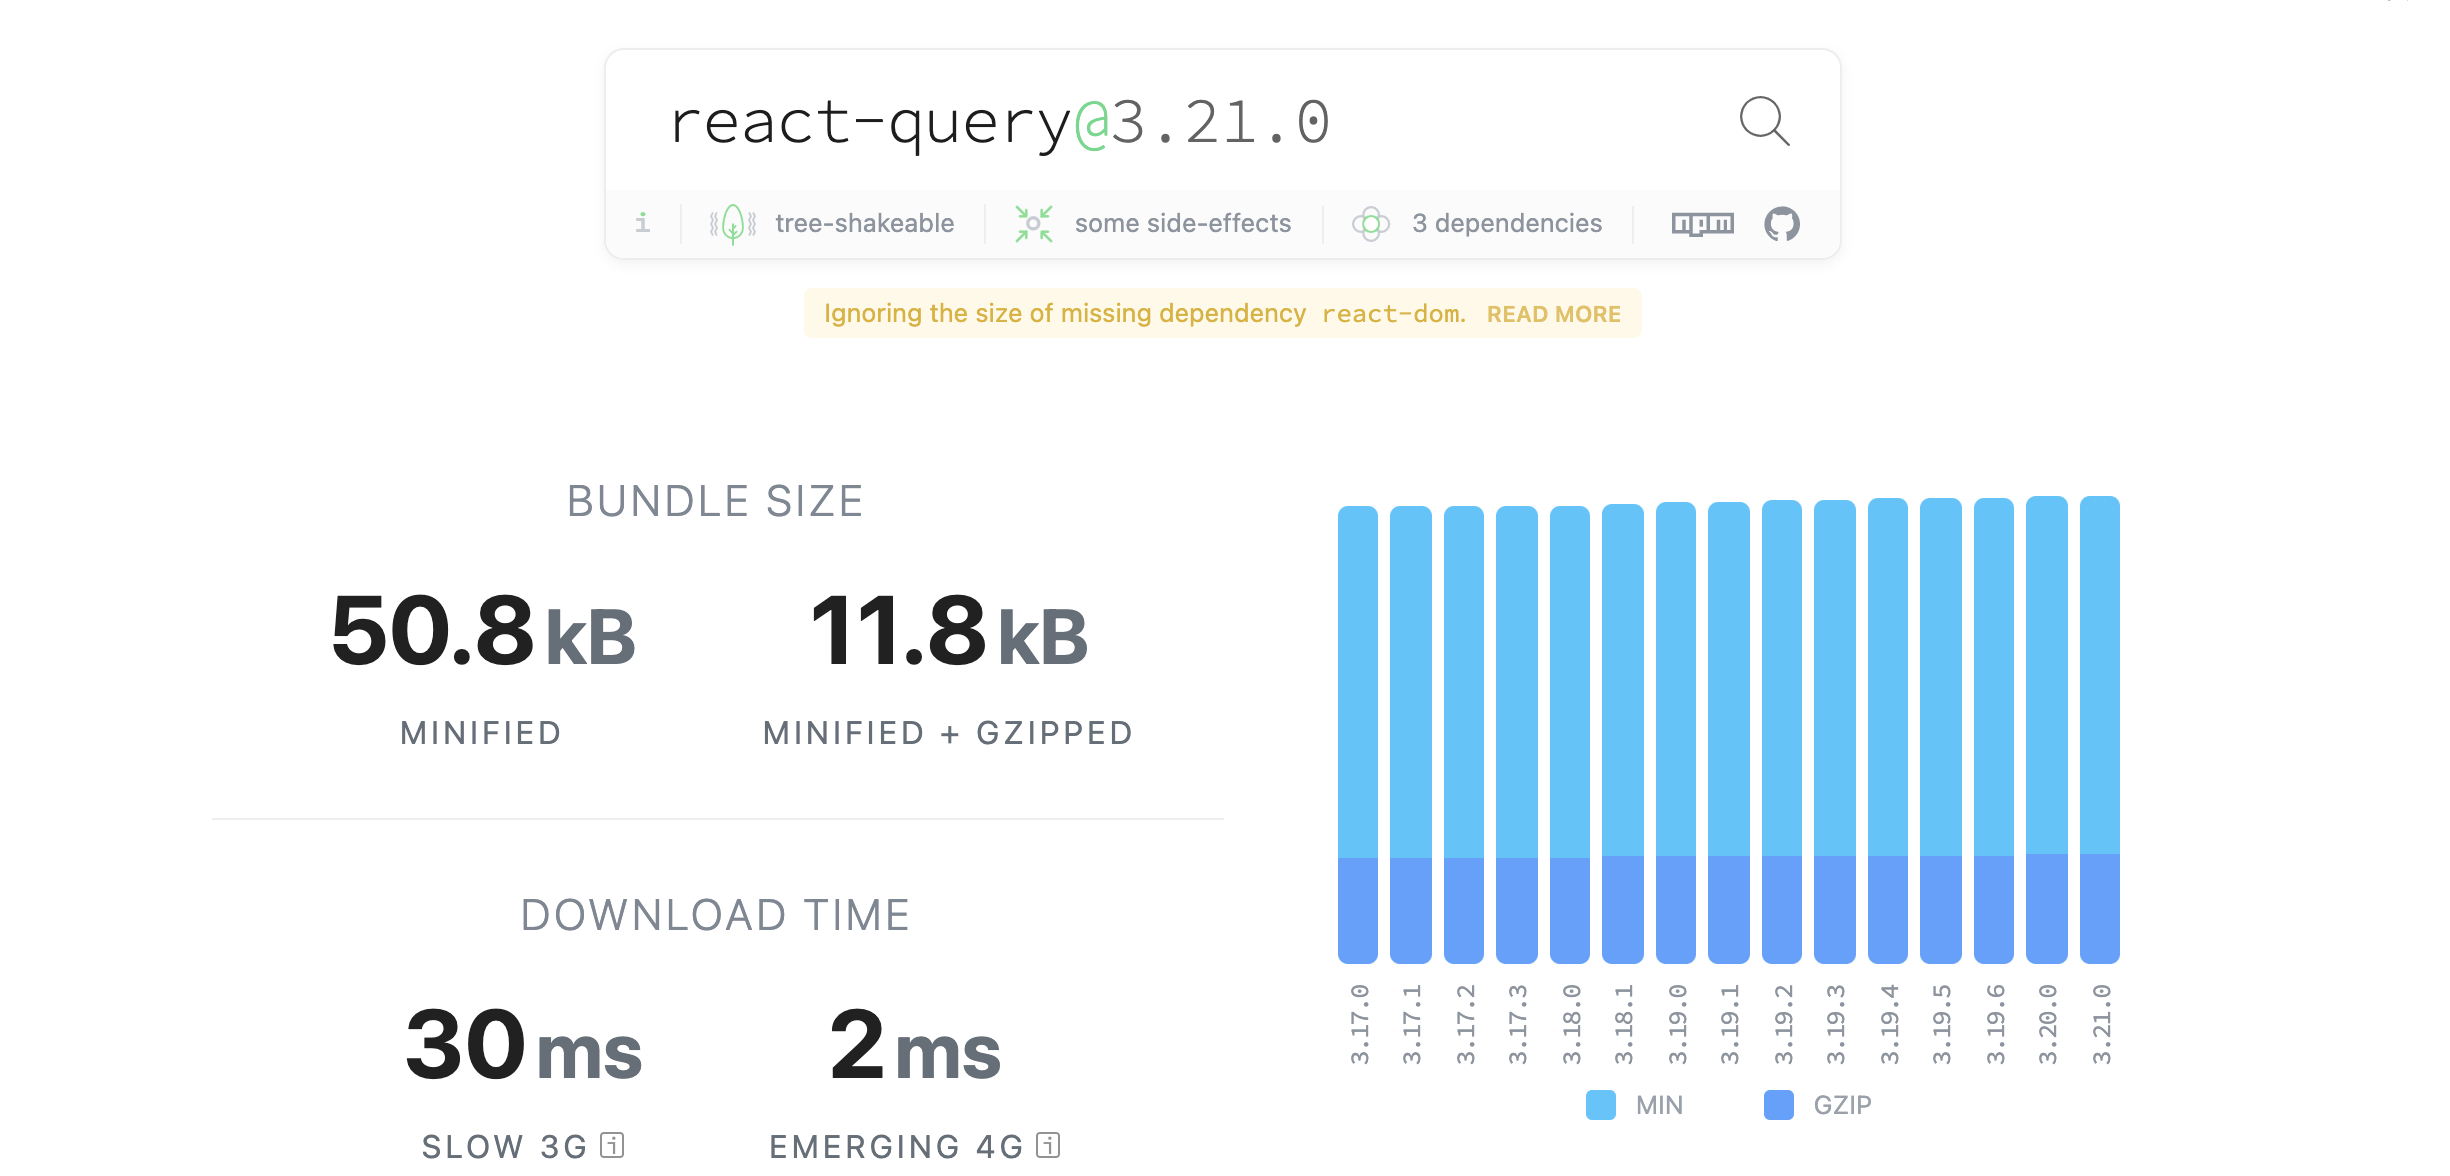
I would recommend going with react-query as it will cover every possible scenario. But it has one downside. The bundle size of react-query is almost 3 times compared to SWR. which is pretty significant.


So if you are building a small application and don’t need many sophisticated features then you should go with SWR. For every other scenario, I would recommend going with react-query.
That’s it for today. Have a great day!
Get in touch with me via LinkedIn or personal website